How to Tile a Roof with Slate, Install a Dry Verge & Fit a Dry Ridge | ULTIMATE Smart Shed (Part 10)
How to tile a roof with slate is the focus of this next step in our Ultimate Smart Shed build series! If you’ve been following along, you’ve seen us progress from a raw concrete slab all the way to a fully engineered, double-top-plated roof frame cladded in structural OSB.
Now, it’s time to make this building completely watertight.
Buying an off-the-shelf garden shed kit usually means dealing with cheap, flimsy roofing felt that tears, degrades, and leaks within a few winters. Because this “Smart Shed” is going to house expensive workshop tools and home office tech, I decided to go premium. In this guide, I’m breaking down the step-by-step process of wrapping the structure, calculating a precise roof batten gauge, laying modern fibre-cement synthetic slate tiles, and finishing the edges with a clean, maintenance-free dry verge system.
Best of all? This was the first time I’ve ever tiled a roof, and I did it entirely solo. If I can do it, you can too.
Watch the Build: How to Tile a Shed Roof

The Ultimate Checklist: How to Tile a Roof Solo
If you are looking for a quick breakdown of how to tile a roof before diving into the detailed steps below, here is the structural order of operations. Master these five core phases, and you will understand exactly how to tile a roof with professional-grade results:
- Weatherproofing: Prepare the deck with breathable membrane and wrap the walls horizontally to create a weather-tight envelope.
- Battening: Calculate your exact spacing requirements—knowing your specific tile measurements is the secret to how to tile a roof without uneven courses at the top.
- Setting the Perimeter: Install your eaves tiles and dry verge tracks to secure the edges against wind uplift.
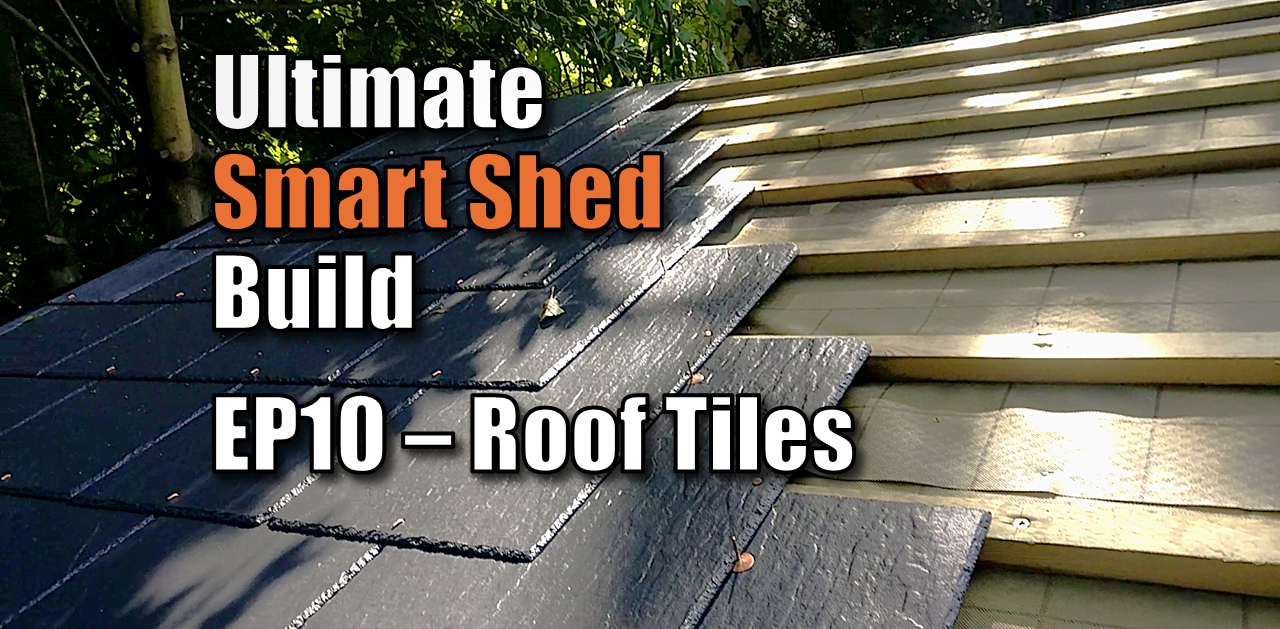
- Laying the Slates: Work in a staggered, diagonal pattern up the roof pitch, securing each tile with copper clout nails and disc rivets.
- Capping the Ridge: Install a modern dry ridge cap system to seal the apex mechanically.
Whether you are building a garden office, a workshop, or a simple tool shed, learning how to tile a roof using modern synthetic slate is a highly rewarding DIY skill that will save you thousands of pounds in labuor costs.
Step 1: How to Tile a Roof Starting with Weather Wrapping
Before picking up a single tile, the rest of the timber frame needed protection. While the roof decking was already covered in a breathable membrane from the previous episode, the OSB wall cladding was still exposed.
To dry-in the structure, I wrapped the walls horizontally with a breathable, UV-resistant vapour barrier, working from the bottom up.
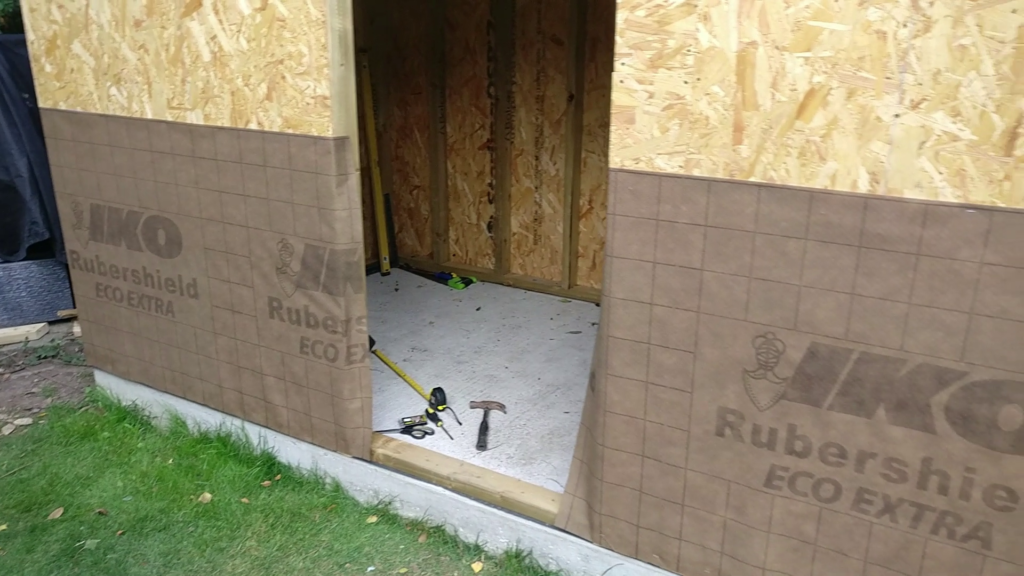
- The String Line Trick: Working completely solo means you don’t have a second pair of hands to keep a massive roll of membrane straight. To fix this, I measured and snapped a level string line at exactly 1 metre up from the base all the way around the shed. This gave me a perfect visual guide to staple the first layer smoothly without any puckering.
- The Overlap Rule: When moving up to the next layer, I allowed an overlap of roughly 100mm to 200mm (4 to 8 inches). This ensures that any water driving through the outer cladding naturally sheds downward over the top of the lower layer rather than tracking behind it.
Step 2: The Anatomy of a Modern Tiled Roof (Materials & Costs)
Real natural slate looks incredible, but it is incredibly heavy, difficult to handle, and highly expensive. For this build, I opted for a modern alternative: Fibre-Cement Synthetic Slates.
At just under £2 per slate, these man-made tiles offer the beautiful textured look of authentic slate at a fraction of the cost. They also come pre-drilled with two nail holes at the top and a central rivet hole at the bottom, making installation significantly faster.
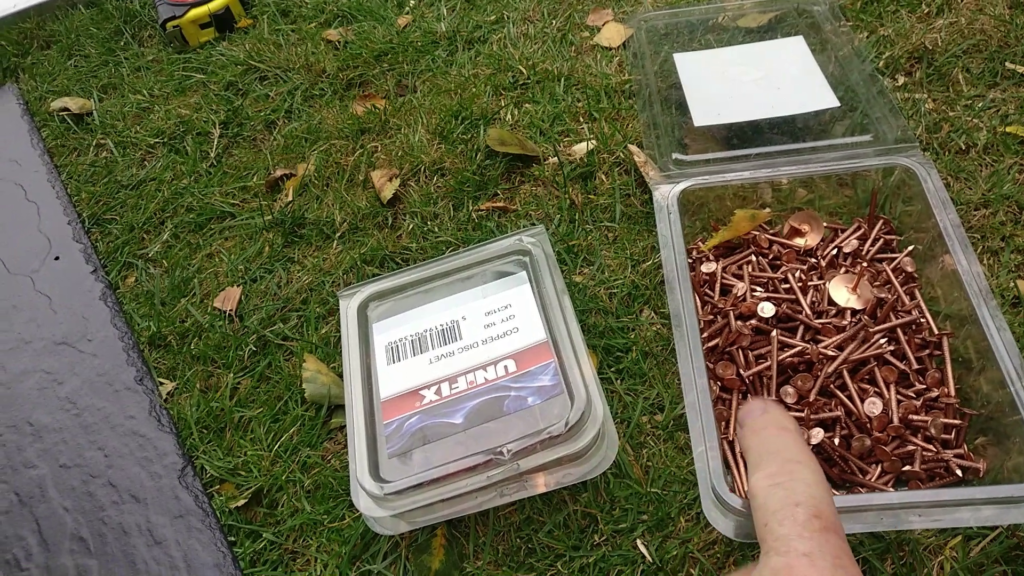
To lock this roof down against high winds and driving rain, I used a modern three-part fixing kit:
- 30mm Copper Clout Nails: Used to pin the top of the slate into the wooden roof battens.
- Copper Disc Rivets (Tingles): Pushed up from beneath the slates to mechanically lock the bottom edge of the tile to the course below it, preventing heavy wind uplift.
- The Dry Verge System: High-quality plastic verge caps that clip over the edge of the roof tiling battens, acting as a secure track for the perimeter slates to slide into.

The Professional’s Secret: Sorting, Culling, and Blending
Even though manufactured fibre-cement slates have incredibly tight dimensional tolerances compared to natural stone, professional roofers never just pull tiles from a single pack and nail them straight down.
Before loading the roof, I carried out two essential quality checks:
- Culling for Transit Damage: I inspected the slates as I unpacked them to check for hairline cracks or chipped edges caused during transit. Any imperfect tiles weren’t wasted; I set them aside to use for the cut pieces at the gable ends.
- Batch Blending: Even with modern manufacturing, slight colour variations can occur between different production batches. To prevent blocky patches or noticeable lines on the roof pitch, I mixed slates from two or three different bundles as I went. This ensures any subtle shading differences blend seamlessly across the entire roof for a completely uniform look.
Step 3: Calculating Your Batten Gauge & Eaves Overhang
Setting out your roof battens is one of the most critical steps for DIYers when learning how to tile a roof. If your spacing is wrong, your slates won’t overlap correctly and the roof will leak.
The Eaves Setup
Your first two battens are entirely dictated by your gutter line. I extended my slates to overhang the edge of the roof by 60mm to 65mm. This ensures that rainwater drains cleanly into the centre of the guttering rather than tracking backward down the fascia board.
To make this work, you lay a shortened “eaves slate” (cut off just above its pre-drilled nail holes) on the very first edge batten, which establishes the baseline for your first full-sized tile.

The Batten Gauge Math
To calculate the even spacing (gauge) for the rest of the roof battens, you use the pre-drilled nail holes on your tiles:
- Measure the exact distance from the top of your ridge beam down to the nail line of your second eaves batten.
- Divide that total distance by the recommended maximum gauge of your specific tile (based on the tile’s length minus the required headlap).
- For my roof, the raw math resulted in an uneven number (7.59 courses). To fix this, I rounded it up to 8 even courses, which recalculated into a perfect spacing of exactly 23.5cm (235mm) from the top of one batten to the top of the next.
This simple math guarantees that your tiling pattern looks completely seamless and symmetrical from the gutter line all the way to the absolute peak.
Understanding Headlap Approach for Low-Pitch Roofs
When designing a slate roof, your pitch dictates your overlap. Traditional slate typically requires a minimum roof pitch of 22.5° to 25° to allow water to shed rapidly. Because our Smart Shed features a 20° low-pitch roof, we fall into a threshold where water clears more slowly, increasing the risk of wind-driven rain getting forced up and under the tiles via capillary action.
To counter this and ensure total compliance with BS 5534 (the British Standard code of practice for slating and tiling), I adjusted the headlap.
| Roof Pitch | Minimum Headlap Required | Structural Rationale |
| 25° and Above | 75mm – 90mm | Steep slope allows rapid water shedding; less overlap needed. |
| 20° (Our Smart Shed) | 100mm – 110mm | Low-pitch threshold. Requires maximum overlap to prevent water tracking backward under the tiles. |
By stepping up to an intentional 100mm+ headlap and matching our batten gauge to it precisely, the roof remains completely watertight even during severe winter storms. Furthermore, ensure that the factory-graded roofing battens you source are fully stamped with BS 5534 markings, guaranteeing they have been pre-sorted for knots, splits, and structural integrity.
Step 4: Laying Slate Solo (The Diagonal Approach)
When figuring out how to tile a roof completely solo, strategy is everything. If you try to lay tile rows completely straight across a roof while working alone, you will constantly find yourself sitting or kneeling on your newly laid tiles, risking cracks and cosmetic damage.
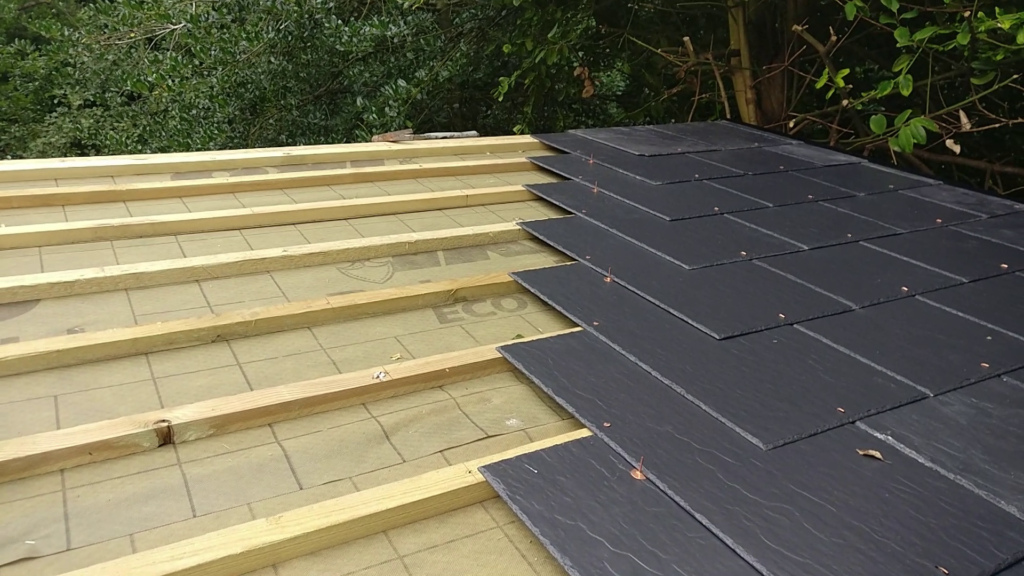
- The Builder’s Secret: Work upward in a diagonal stepped pattern. By stepping the courses diagonally, you always leave an open area of bare wooden battens on one side of you. This allows you to safely sit, rest your tools, and nail the next tile into position without ever putting your body weight onto the finished slate.
- Setting the Rivets: As you move up, remember to slide your copper disc rivets into the gaps between the lower slates before dropping the next tile over them. Once the top is secured with two copper clout nails, you gently bend the protruding copper pin flat over the face of the tile with a hammer to lock the tail down permanently.
Step 5: How to Cut Synthetic Slate (The “Score & Snap” Method)
When you reach the edges of your roof or the dry verge tracks, you will inevitably need to cut down your perimeter tiles to maintain your half-bond brick pattern. While natural stone requires a heavy slate cutter or an angle grinder, synthetic fibre-cement slate is incredibly DIY-friendly.
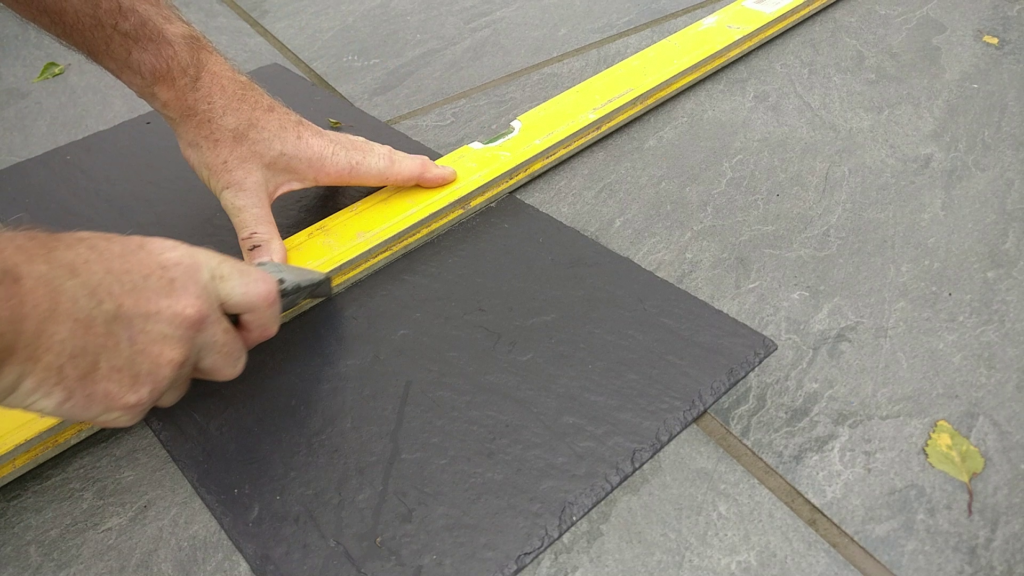
- Pro-Tip: Never use power saws that create massive clouds of toxic cement dust. Instead, place your tile on a perfectly flat scrap surface. Lay down a straight edge (I just used a standard spirit level) across your cut mark. Using a sharp Stanley knife, score a deep line across the face of the tile 3 to 4 times.
- The Snap: Place the tile so your scored line sits perfectly flush over the sharp edge of your level or workbench. Apply gentle, even downward pressure across the overhanging section. The tile will snap cleanly along your score line every single time, leaving an airtight, professional edge.
Step 6: Installing a Flexible Dry Ridge System
To cap off the apex of the roof, I opted for a modern, flexible plastic Dry Ridge Cap system (£4 per cap). These modular units stack sequentially over one another, automatically adjusting to match whatever pitch your roof frame happens to be (in our case, a 20-degree pitch).

Each cap features a pre-moulded divot where a heavy-duty screw drives directly downward through the interlocking joints and straight into our structural C24 ridge beam.
- The Last Piece Trick: When you reach the absolute edge of the roof, the final cap won’t sit perfectly flush. Following the manufacturer’s advice, I trimmed the final section to fit, heavily packed the interlocking seams underneath with high-quality exterior silicone, and drove the final fixing screw home.
- Weather Protection: To guarantee absolute water protection and a pristine finish, I coated the exposed galvanized screw heads on the end cap with a dab of waterproof black bitumen paint. This blends the hardware seamlessly into the ridge cap while preventing any long-term moisture tracking.
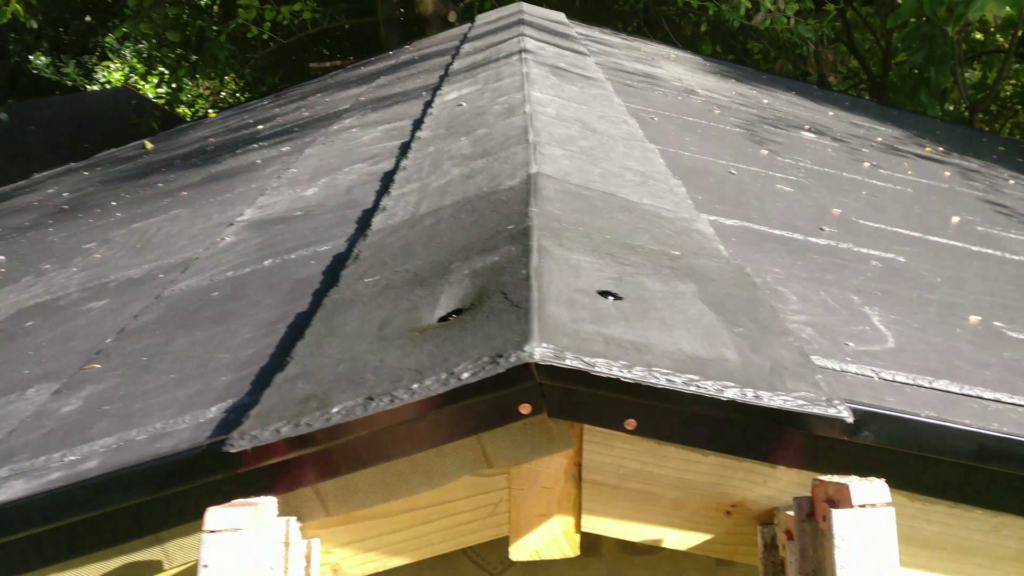
The final Result
I am pleased with the overall result. The slate looks perfect. Its a great aesthetic, the grey slates will be a perfect match for the black feather edge walls that come next. The dry verge gives a perfect straight maintenance free finished edge.

Structural Logic: Why Modern Dry Roofing Beats Traditional Mortar
If you look at older extensions or traditional garden sheds, the ridge tiles and edge verges are almost always sealed using a traditional sand-and-cement mortar bed. While traditional, this method is highly flawed for standalone timber outbuildings:
- The Flex Factor: Wood is a living material. A timber shed expands, contracts, and shifts subtly with seasonal humidity and heavy wind loads.
- Mortar Failures: Because cement mortar is completely rigid, structural shifts cause it to dry out, crack, and eventually break away. Once that mortar bond fails, damp drives into your roof space.
- The Mechanical Advantage: By utilizing a plastic Dry Verge and Dry Ridge system, the entire perimeter is secured using mechanical screws and nails. The plastic tracks allow for thermal expansion while maintaining a perfectly straight, watertight perimeter that will easily last 25+ years without a single drop of maintenance.
Technical Specifications Reference
For the builders tracking materials for their own DIY workshop or home office build, here are the exact specifications used in this Part 10 how to tile a roof stage:
| Component | Specification | Why It Matters |
| Roof Tile Type | Fibre-Cement Synthetic Slate | Provides a premium slate texture at a fraction of the weight and cost (£2/slate). |
| Tile Fixings | 30mm Copper Clout Nails & Copper Tingles | Offers excellent corrosion resistance and mechanical lock against wind uplift. |
| Perimeter Edge | Plastic Dry Verge System | Keeps water tracking cleanly into gutters without cracking like cement mortar. |
| Batten Gauge | 23.5cm (235mm) Even Spacing | Evenly divides 8 full courses to match our specific 20-degree roof slope. |
| Eaves Overhang | 60mm – 65mm Past Fascia Line | Delivers rain straight into the centre of the gutter profile to protect the framing. |
| Apex Finish | Flexible Dry Ridge System + Bitumen Paint | Provides a highly durable, modular waterproof seal across the main ridge line. |
How to Tile a Roof (FAQ)
Q: Why use copper nails instead of standard galvanized framing nails?
A: Roofs are subjected to severe, constant moisture cycles. Standard steel or cheap zinc coatings eventually rust through, causing “nail sickness” where tiles slip off the roof. Copper doesn’t rust and creates a permanent bond that easily outlasts the lifespan of the timber battens.
Q: Do I need a specialized slate cutter for synthetic fibre-cement tiles?
A: Not at all! As shown in the build video, a sharp Stanley utility knife and a straight edge are all you need. Deeply score the tile face a few times and snap it over a sharp edge for a clean, dust-free cut.
Q: Why did you lay the slates in a stepped diagonal pattern?
A: This is a key technique for solo builders. Laying tiles diagonally leaves a clear path of exposed structural wooden battens next to you. This means you can easily sit and climb up the roof without stepping on and cracking your newly installed slates.
More Shed Episodes
- Framing a Shed Roof, Making Birdsmouth Cuts & OSB Decking | ULTIMATE Smart Shed (Part 9)
- How to Anchor a Shed to a Concrete Slab: The Ultimate Shed Build Part 8
- Shed Framing & Structural OSB Sheathing | ULTIMATE Smart Shed (Part 7)
- Building the ULTIMATE Smart Shed (Part 6 – Framing the Front Wall)
- How to Frame Shed Side Walls: The Ultimate Smart Shed (Part 5)
- Shed Framing 101: How to Build a Strong Rear Wall (Smart Shed Part 4)
- Building the Ultimate Smart Shed (Part 3): How to Build a Concrete Shed Foundation
- How to Remove a Tree Stump the Easy Way: No Digging Required!
- How to Install Concrete Anchor Bolts (The Best Way to Secure a Shed)
- Building the Ultimate Smart Shed (Part 1): Plans & Site Preparation
- Introducing The Ultimate Smart Shed Build: Why We’re Building a High-Security, Tech-Integrated DIY Shed
What’s Next?
The Ultimate Smart Shed is officially dried-in, watertight, and fully protected from the elements! Now that the roof is finished, we can focus our attention on the exterior aesthetics. In the next episode, we are diving straight into installing the exterior counter-battening, fascia boards, soffits, and premium feather-edge timber cladding to completely transform the look of the structure.
Subscribe Now!
If you found this how to tile a roof guide interesting and are ready to stop guessing and start troubleshooting your own tech plus smart DIY, head over to the Built By Pete YouTube channel! We’ve got hundreds of other DIY projects and smart home tutorials. Click here to subscribe to the BuiltByPete youtube channel and hit the notification bell so you never miss out on the tips, tricks, and step-by-step guides that will simplify your tech life.