How to Wire a Ceiling Rose: The Ceiling Rose Explained
How to wire a ceiling rose! Have you ever looked up at your light fitting and wondered what complex wiring is hiding in that unassuming plastic base? That component is the ceiling rose, an essential, yet often misunderstood, part of your home’s lighting circuit.
Whether you’re planning on installing a new ceiling rose or removing an old one to fit a more modern light fixture, understanding its purpose and wiring is crucial for a safe and successful job.
Safety Warning: Before touching any wires, always ensure the electricity supply to the circuit is switched off at the consumer unit (fuse box). If you are in any doubt about electrical work, always consult a qualified electrician.
Also, take a look at our Introduction to UK Domestic Wiring
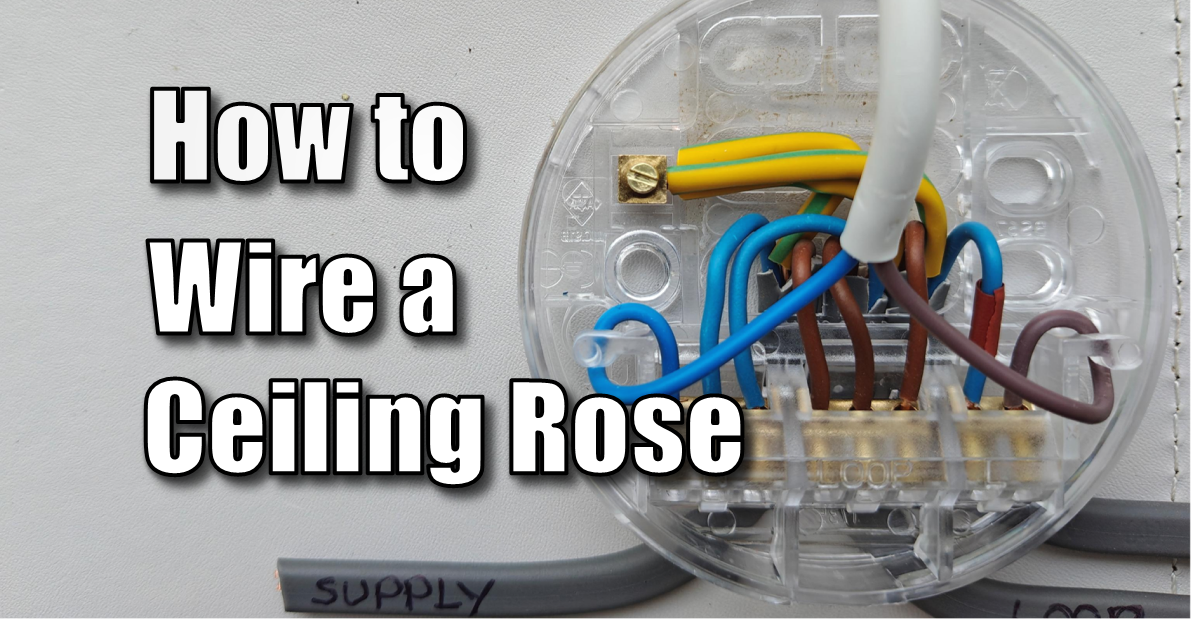
Watch the Full Build: How to Wire a Ceiling Rose
For a visual guide on how to wire a ceiling rose and on these connections and to see the process in detail, watch the full video from Built By Pete here:
What is a Loop-Through Ceiling Rose?
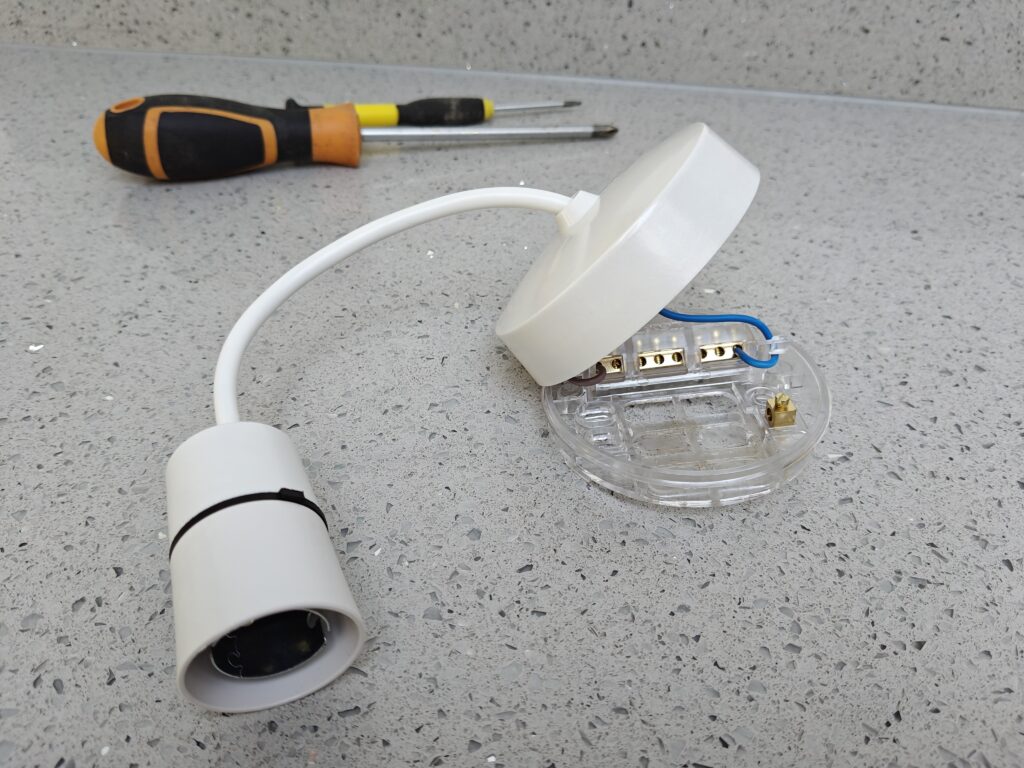
A typical ceiling rose has a base that screws into the ceiling and contains an electrical terminal block, alongside a pendant fitting for suspending a light bulb.
In the UK, most lighting circuits use a loop-in wiring method, and the ceiling rose is designed to manage this. The ceiling rose acts as a junction box, eliminating the need for separate boxes by splitting the main electrical circuit cable into connections for:
- The Light Fitting: Powering the bulb.
- The Wall Switch: Controlling the light.
- The Next Rose: Looping the power through to the rest of the lighting circuit.
This component is a clever and essential part of your home’s electrical system, managing complex wiring connections safely and effectively.
Ceiling Rose Terminal Blocks Explained
The terminal blocks are the “brains” of the operation, each serving a specific function to complete the circuit. While the layout might vary by manufacturer, you will find four main connections:
| Terminal | Description & Purpose |
| Loop Terminal | This is the central connection for the permanently live wires. It connects the live wire coming from the main circuit and the live wire that runs down to the wall switch. |
| Neutral Terminal | This connects all the common neutral wires, which are necessary to complete the electrical circuit back to the consumer unit. |
| Switched Live / Line Terminal | This is the connection that takes the wire coming up from your wall switch. When you turn the switch on, this terminal becomes live, transferring current to the light fitting and illuminating the bulb. |
| Earth Terminal | A critical safety feature. All earth wires from all connected cables are connected here, providing a safe path for electricity to flow to the ground in the event of a fault. |
Step-by-Step Ceiling Rose Wiring Guide
To understand how to wire a ceiling rose, it helps to know the modern UK colour code:
- Brown: Live (L)
- Blue: Neutral (N)
- Green and Yellow: Earth (E)
Here is a breakdown of how the cables are connected:
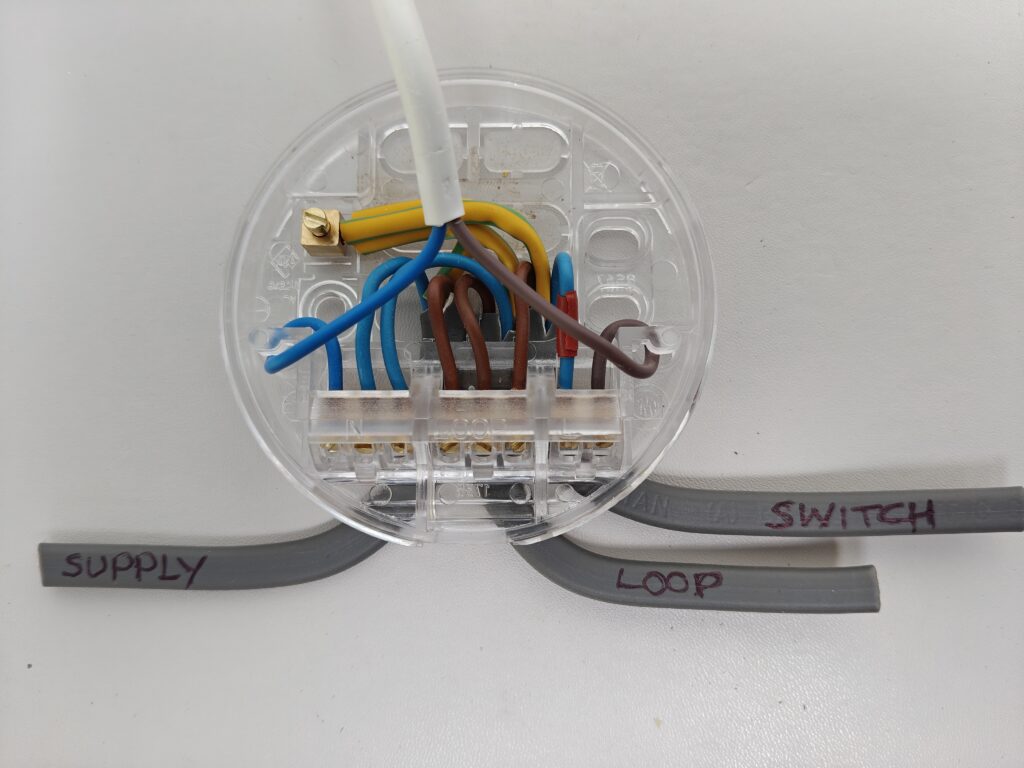
1. The Main Circuit Cables
- Main Live Wire: Connects to the Loop Terminal (to provide continuous power).
- Main Neutral Wire: Connects to the Neutral Terminal.
- Earth Wires: All earth wires from the main circuit and the wall switch cable connect together at the Earth Block. Remember to add the correct earth sleeving if needed.
Pro Tip: The return wire from the switch is usually blue indicating a neutral wire. This is in fact going to be live and so a brown sleeve should be used to indicate that it is in fact live!
2. The Wall Switch Cable
The twin core and earth cable running down to your wall switch carries power to and from the switch mechanism:
- The permanent live wire (often brown) from the main circuit is typically looped into the cable that runs down to the switch.
- The return wire (often blue, but usually marked with a brown sleeve to indicate it is carrying a live current) connects to the Switched Live / Line Terminal. This wire brings the live current back up to the ceiling rose when the switch is flipped.
3. The Light Fitting Cable (The Flex)
The flexible cable that drops down to your light bulb holder (the pendant fitting) also has live, neutral, and earth wires:
- The Live wire connects to the Switched Live / Line Terminal (so it only receives power when the switch is on).
- The Neutral wire connects to the Neutral Terminal.
- The Earth wire connects to the Earth Terminal.
Pro Tip: Ensure the flexible cable from the light fitting is looped around a cable grip within the ceiling rose. This prevents loose wires and maintains a secure connection, reducing the risk of a potential fire hazard.
For a visual guide on these connections and to see the process in detail, watch the full video from Built By Pete here:
How to Wire a Ceiling Rose | Ceiling Rose Explained

Ceiling Rose Wiring FAQ
What is the purpose of a ceiling rose in a lighting circuit?
A ceiling rose acts as a junction point for the lighting circuit. It connects the power coming from the consumer unit (or the previous light), the power going to the next light in the loop, and the switch wire that controls the bulb.
Why are there so many wires in a ceiling rose?
In a standard “loop-in” system, the ceiling rose contains three distinct groups of terminals: the Loop (always live), the Neutrals, and the Switched Live (connected to the bulb). This allows the circuit to continue to other rooms even when the light is switched off.
Which wire is the “Switched Live”?
The Switched Live is the wire that returns from your wall switch to turn the light on. Even though it is often a blue wire (in modern twin and earth cable), it should be marked with brown electrical sleeves (tape) to indicate that it is actually live when the switch is on.
What happens if I connect the light to the “Loop” terminal?
If you connect the brown wire from your lamp pendant directly to the central “Loop” terminals, the light will stay on permanently and cannot be turned off by the wall switch. The lamp pendant must be connected to the Neutral and the Switched Live terminals.
Is an Earth connection necessary for a plastic ceiling rose?
Yes. Even if the light fitting itself is plastic, the Earth wires must be connected together in the designated terminal. This ensures that the circuit remains grounded for the rest of the house and provides safety if you ever replace the plastic fitting with a metal one.
Do I need to turn off the whole house power to change a ceiling rose?
For maximum safety, yes. While turning off the lighting circuit at the consumer unit is standard, turning off the main isolator ensures there is no risk of a borrowed neutral or “back-feed” causing an electric shock while you are working.
Subscribe Now!
If you found this how to wire a ceiling rose guide helpful and are ready to stop guessing and start troubleshooting your own tech plus smart DIY, head over to the Built By Pete YouTube channel! We’ve got the full video walk through, plus dozens of other DIY projects and smart home tutorials. Click here to subscribe and hit the notification bell so you never miss out on the tips, tricks, and step-by-step guides that will simplify your tech life.